A Comprehensive Guide to Extremity Splinting
Rob Beatty, MD FACEP
Splinting an extremity is a fundamental skill in orthopedics, emergency medicine, and athletic training, designed to immobilize an injured limb and provide comfort and support. The materials used have evolved significantly, offering a range of options for providers. Products and brands vary, from generic plaster-based rolls to modern fiberglass splinting systems like OCL, Dynacast, or Exos. The choice between traditional plaster and fiberglass often depends on provider preference and the specific injury.
Plaster is economical and highly moldable, but it is heavy, messy to apply, and takes a longer time to dry and harden. Fiberglass, conversely, is lighter, stronger, and cures quickly, but it can be more expensive and is not as forgiving to mold as plaster. Regardless of the material, the layering process is crucial for a successful splint: a cotton stockinette is applied first to protect the skin, followed by generous padding to cushion the limb and protect bony prominences, and then the wetted splint material itself. The final layer is an elastic bandage, applied with even pressure to hold everything in place.
The method used to wet the splinting material is critical to its final strength and effectiveness. For fiberglass and plaster, the most common and effective technique is the submersion method. This involves completely immersing the splint material in a bucket of room-temperature water. A few gentle squeezes while it is submerged ensure all layers are saturated, and then a final squeeze removes excess water. This method guarantees a uniform and even wetting of the material, which leads to a consistent and strong final product. While some providers may use a running water technique, this can often lead to uneven wetting and a less reliable final splint, making submersion the preferred standard.
| Image Box | Splint Name | Instructions & Tips |
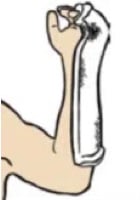
|
Ulnar Gutter Splint |
Indications: Fractures of the 4th/5th metacarpals (“boxer’s fracture”), soft tissue injuries to the ulnar side of the hand. Instructions:
|
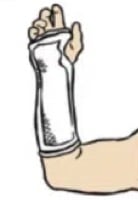
|
Volar Splint |
Indications: Soft tissue injuries to the wrist, carpal tunnel syndrome, and some carpal bone fractures. Instructions:
|
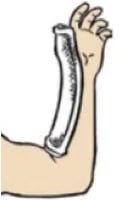
|
Thumb Spica Splint |
Indications: Scaphoid fractures, thumb sprains (e.g., gamekeeper’s thumb), and thumb metacarpal fractures. Instructions:
|
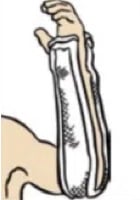
|
Forearm Sugar Tong Splint |
Indications: Fractures of the forearm (radius and ulna) that require rotational control. Instructions:
|
|
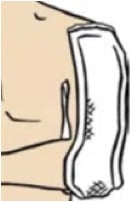
Humeral Sugar Tong Splint |
Indications: Mid-shaft humeral fractures and some elbow dislocations. Instructions:
|
|
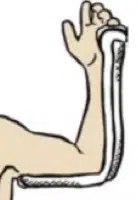
Posterior Long Arm Splint |
Indications: Fractures of the elbow, humerus, and distal forearm with associated instability. Instructions:
|
|
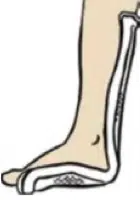
Posterior Short Leg Splint |
Indications: Ankle fractures, foot fractures, and soft tissue injuries to the lower leg. Instructions:
|
|
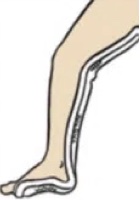
Posterior Long Leg Splint |
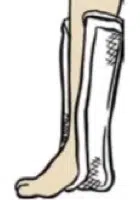
Indications: Knee dislocations, femur fractures, or tibia fractures. Instructions:
|
|
Stirrup Splint |
Indications: Ankle fractures and severe ankle sprains, especially when medial-lateral stability is needed. Instructions:
|
|
Medial-Lateral Long Leg Splint |
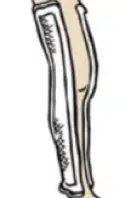
Indications: Knee ligament injuries or dislocations, providing stability to the knee joint. Instructions:
|
Pro Tips for Splinting
- Pad Bony Prominences: This is a crucial step to prevent pressure sores. Always add extra padding over areas like the elbow (olecranon), the sides of the wrist (radial and ulnar styloids), the heel, and the ankle bones (medial and lateral malleoli).
- Maintain Proper Joint Position: Immobilizing the joints in a functional position is key. For the wrist, this is typically a slight extension (20 degrees). For the ankle, it’s a neutral position (90 degrees). These positions prevent contractures and promote healing.
- Use C-Splints: For hard-to-splint areas or complex injuries, a “c-splint” (a pre-formed aluminum splint) can be a valuable tool. It is particularly useful for stabilizing finger fractures or joint dislocations before definitive splinting.
- Neurovascular Checks: Always leave the fingertips and toes exposed. This allows you to easily check the patient’s capillary refill, sensation, and motor function after the splint is applied, ensuring it is not too tight and compromising blood flow or nerve function.
- Explain Everything to the Patient: Advise the patient to monitor for increased pain, numbness, tingling, or discoloration, and to seek immediate medical attention if these symptoms occur. A well-educated patient is more likely to have a good outcome.
Splinting Humerus Fractures
Fractures of the humerus shaft are unique in their management. Due to the anatomy of the upper arm, many mid-shaft humeral fractures can be effectively treated with a simple sling and swathe, a method sometimes referred to as “sugar tong” or “hanging arm” casting. This approach leverages gravity to maintain alignment of the fracture fragments. The splint’s purpose is not rigid immobilization but rather to control rotation and support the weight of the arm, allowing the patient to rest comfortably.
The healing process for these fractures is particularly interesting. The humerus has a thick periosteal layer and excellent blood supply, which allows it to heal very well, even with a degree of angulation. The body’s natural remodeling process, which occurs in the months and years following the injury, will often correct any residual angulation over time. This makes a functional brace or a simple splint and swathe an effective and less cumbersome treatment option compared to full casting or surgical intervention in many cases. The key is to support the arm’s weight and control rotation while allowing for controlled movement as directed by a healthcare provider.
Post-Splint Care and Neurovascular Injuries
After a splint has been successfully applied, the job is not yet complete. A thorough post-splint neurovascular examination is critical to ensure that the patient’s limb is not compromised. This is commonly assessed by checking the “5 P’s”: Pain, Pallor, Pulselessness, Paresthesia, and Paralysis.
Certain fracture types are more prone to specific neurovascular injuries due to their anatomical location:
- Distal Radius Fractures: Fractures of the wrist, particularly those with significant displacement, can compromise the median nerve. This can lead to paresthesia (tingling, numbness) in the thumb, index, middle, and a portion of the ring finger.
- Supracondylar Humerus Fractures & Elbow Dislocations: These injuries in children are notorious for their association with neurovascular compromise. The fracture fragments can directly impinge on the brachial artery, leading to a loss of distal pulse (pulselessness), and can also injure the median and ulnar nerves.
- Tibia Shaft Fractures: Fractures of the lower leg, especially those with significant swelling or compartmental changes, can cause injury to the common peroneal nerve. This can manifest as a “foot drop,” where the patient is unable to dorsiflex their ankle and toes.
Properly applied splints, combined with careful post-application monitoring, can help mitigate these risks. If any of the “5 P’s” are noted, the splint should be immediately removed and a reassessment performed.
Immediate vs. Outpatient Fracture Care
It is critical to be able to distinguish between a fracture that can be safely managed with a splint and an outpatient follow-up appointment versus one that requires an immediate orthopedic evaluation and potential surgical intervention. The severity and location of the fracture, as well as the presence of associated injuries, are the primary factors in this decision.
| Immediate Orthopedic/Surgical Evaluation | Outpatient Follow-up |
| Open Fractures: Any fracture with an open wound communicating with the bone. | Undisplaced or Minimally Displaced Fractures: Fractures where the bone fragments remain in good alignment. |
| Fractures with Neurovascular Compromise: Fractures causing a loss of sensation, pulse, or motor function distal to the injury. | Non-articular Fractures: Fractures that do not involve a joint surface. |
| Compartment Syndrome: Swelling within a closed compartment that compromises blood flow and nerve function. | Stress Fractures: Small cracks in the bone, often caused by repetitive stress. |
| Specific Joint Dislocations: Especially knee and elbow dislocations, due to the high risk of neurovascular injury. | Torus or Buckle Fractures: Common, stable fractures in children that do not require reduction. |
| Displaced or Angulated Fractures: Fractures where the bone fragments are not properly aligned. | Isolated Finger or Toe Fractures: Many of these can be treated conservatively with buddy taping or a simple splint. |
| Femoral Neck Fractures: Due to a high risk of avascular necrosis (loss of blood supply to the femoral head). | Simple Sprains or Soft Tissue Injuries: When an X-ray has confirmed no fracture. |
Take Your Skills to the Next Level with Provider Practice Essentials
For clinicians looking to master the procedural skills of emergency and urgent care medicine, the live and online workshops from Provider Practice Essentials (PPE) are an invaluable resource. Programs like their Clinical Skills and Procedure Workshop offer a unique, hands-on learning experience that goes beyond standard lectures. With an emphasis on small class sizes, one-on-one attention from experienced instructors, and the use of real-time simulators, these courses provide the practical knowledge and confidence needed to excel. Whether you are a new provider looking to get “practice ready” or an experienced clinician seeking to refine your skills, PPE’s courses are a highly recommended investment in your professional development.
